Tuesday, March 24, 2009

Tech Talk Tuesday

We are still discussing composition, and today I'll talk about framing. There are some simple 'tried and true' techniques for making your photos more interesting and dynamic and one of them is framing. I've talked a bit about determining what your subject is, then making sure that subject stands out over other elements in the picture. One way to do this is to create a frame out of other objects or elements that will naturally lead the eye toward the main subject. Framing the subject also adds detail that makes the photo more interesting. Remember, however, that the framing needs to support the subject and not detract from what you want the viewer to concentrate on. Study the following examples:


Notice how the bride is framed within the arch of the gazebo. (Also notice how the lighting naturally highlights her face, the most important part of a portrait picture.)


Lindsey is definitely the focal point of this photo. She stands in a frame within a frame. The dark outside frame naturally leads your eye to the beautiful bride in the center who is lighter and brighter than the frames that surround her.


Here is a beautiful Belize sunrise. I think this photo would have been boring if I'd stood at water's edge and just shot the sky. Standing behind the palms and letting their silhouettes frame the sunrise adds depth and interest to this photo. (Yes, I did have to look up the spelling of the word silhouette!)


Once again, the part of this photo I want people to focus on, (the spires and Angel Moroni), are framed by the tree branches.


I took shots of this cactus from many angles and this is the one that was the most interesting. The bloom is the main attraction, and it is perfectly framed by the backdrop of a cactus leaf(?) in soft focus. Even the highlighted needles are pointing toward the bloom.


This was taken on location of a movie set in Santa Fe during our photography workshop. Other photographers were taking photos of her posing by the bar or sitting on a stool. I saw the reflection in the oval above the bar and thought that would be a great frame to highlight her face so I asked her to pose this way. When you look at this photo try to imagine her facing the other direction. Would this picture be as interesting? Would the most important part of this portrait, (her face), stand out as nicely against the shelf with the bottles? Now go back and look at all the photos and imagine the main subject, but without any of the frames. Do you think they would be as interesting?

Assignment: Next time you pull out your camera to take pictures of something or someone you already have in mind, take a few seconds to look around for an angle that will frame your subject with other objects. (P.S. I don't know if I'm giving tooo much info (boring), or if it's tooo basic (more boring). Is any of this stuff helpful?)

Monday, March 23, 2009

WHERE'S JEFF???????


I was going to post this on Phun Phriday, but I had to do something fun today. We just got back from the annual car show in Las Vegas where the weather was so beautiful and of course we came home to snow!! Anyway, I always tease Jeff that I never see so many gray haired old men all in the same place as I do at these car shows. If I'm looking for him, I always have to really look close because I see him all over the place. So here's my version of "Where's Waldo." See if you can pick out Jeff. I know for those of you who don't see him often this will be nearly impossible but I'm expecting guesses from his siblings and children to see if they know the back of their dad/
brother's
head. (Actually, forget the boys, they were all with him and know what he was wearing. I'll post some more photos of this annual Larsen family pilgramage later.

Tuesday, March 17, 2009

Tech Talk Tuesday

So, we are still talking about Composition, and I've given some brief and general comments on Simplicity and Perspective/View. Then last week was Part 1 on Lighting and I talked about taking pictures of landscapes. This week, Part 2, I'll talk about taking pictures of people, or portraits. (Remember I'm just giving you a nibble in each area I talk about, so if you really want to learn more than my simple comments here, you'll need to do a lot of reading and shooting.)

Here is the most important point to remember when taking photos of people and I'm talking about taking 'head shots' or close ups. The eyes must be the most important feature to highlight on the face. You must make sure your camera's focus point covers the eyes because they must be in sharp focus. Everything else may or may not be sharp or soft focus, but the eyes are the focal point of a portrait and they must be in focus and lit well. Another thing to remember about lighting portraits, is that for the most part, side lighting is more flattering that front lighting. Of course there are exceptions, but remember I'm simplifying to the extreme here.

First I'll talk about taking pictures of people outdoors and then indoors, and I'll illustrate with some pictures I took of my lovely and cooperative model Michelle. I did these in about 10 minutes this morning:


Isn't this lovely - colors bleached out, big dark shadows under her chin and around her eyes. Notice her eyebrow shades her eye so you can't even see it. Obviously this was taken outdoors in bright sun. I told Michelle to face the sun and smile. I didn't give her any coaching and this is what I got. I took about 10 shots and she could not open her eyes. Yet this is what most people do when taking pictures outdoors. The tell their subject to move into and face the sun thinking this will light up their face the best. The thing to remember about this picture is that the absolute worse time of day to take portraits outdoors, (just like landscape pictures), is high noon on a sunny day. The second worse thing is to have the person face the sun.


Next I had Michelle face away from the sun. If I would have taken the photo without a flash, her face would have been very dark because the camera would have exposed for the bright background. Even if I focused on her face, it still would have been too dark. On this shot I turned on my flash (you can tell by the round catch lights in her eyes.) Some compact point and shoot cameras may not allow the flash to go off in a brightly lit scene, but I think on most cameras you have a control that will allow the flash to function. On the more expensive cameras you can also determine how much flash you use. If you are able to have this much control, you should turn your flash down so you have just enough to fill in the shadows and brighten the face (fill flash). Another advantage of shooting into the sun is that it creates beautiful highlights in the hair.


A safer option where your chances are best at getting a decent shot outdoors in bright sun, is to find a place that is in the shade, with subject and background in similar light, and then still use fill flash to make the face 'pop'. If you have a choice, the very best type of day to do outdoor people photography is on a light to moderately overcast day. Look at the ground where an object is creating a shadow. If it is a dark, hard shadow, it is a sunny day and bad light. If it is a dark, overcast day and there are no shadows, your photos will come out dull and flat. If it is an overcast day and there are soft, light shadows, the sky is acting like a big soft box (used in a photography studio), and you'll get beautiful portraits with soft shadows wrapping around the face giving form and definition.

Side note for those who want a bit more information: So far I've recommended using a flash outdoors for better photos when you must shoot in the middle of a sunny day. Now I'm going to contradict that a bit. Using a flash (if it is on the camera), is the last choice for me, whether outdoors or indoors. Straight on flash creates harsh, flat lighting, not soft light coming from the side that would add soft shadows and a more realistic 3-D effect. If you are lucky enough to shoot with a dedicated flash, one that you put on the hot shoe of your camera, there are a variety of little gizmos you can stick on the flash that will diffuse the light, and this helps a bit. The other option that works better is to use no flash, but instead use a reflector. This is flat piece of anything that is usually white or silver or gold. You can use a piece of poster board, or buy a nice reflector at a photo shop. You will need a second person who stands at an angle away from your subject and reflects the sun off the reflector and onto the subject's face. This creates beautiful, warm light and shadows, depending on where the person is standing. (I warned you this was probably more info than you wanted.)


Now let's move indoors. Let me say that most all indoor lighting is bad. Incandescent lights (bulbs) make your subject's skin look like they've eaten too many carrots, (orange), and fluorescent lights make him/her either look like he/she just walked out of a freezer (blue), or is heading to to bathroom to throw up (green). Usually it is dark enough indoors that you need a flash anyway, which will also help neutralize these color casts. Flash indoors has the problems I mentioned earlier- flat, unattractive lighting. (Actually as I look at this photo, this is not bad, but I do have a very nice flash and that makes a big difference.) Another problem with indoor flash is that it casts a shadow on whatever is behind the person, usually a wall. Often this distracts from the portrait. (If you were in a studio, the photographer would have numerous lights to eliminate this.) The best solution if you do not have a dedicated flash, is to make sure your subject stands far away from walls and other objects that are behind them.


If you are lucky enough to have a nice flash attachment, you can twist the flash head toward a nearby wall or the ceiling and "bounce" the flash back at your subject. This eliminates the shadows on the wall, and creates a softer portrait.

The best light of all is natural light, preferably from a north facing window. No flash, just beautiful soft shadows that mold her face and make her eyes pop. How bright the day is will determine how close to the window you would place your subject. First I had Michelle about 4 or 5 feet from the window. I took a few shots and checked the exposure and the light side of her face was too bright or blown out. I then had her move about 6-8 feet away, and this is what I got. I think for setting this up in about 10 seconds, it is a lovely portrait. (It certainly helps that I have a very beautiful and photogenic model!)

Just to end, I did a little (very little) Photoshop work. I cropped in so you focus on her face and eyes. I removed a few tiny blemishes and sharpened her eyes and softened her skin. Wow, this could be a glam shot!

To conclude, notice that in all the photos where I've pointed the flash directly at Michelle at close range, the color seems unnatural and the lighting is harsh. (If I were going to use any of these, I would work them over in Photoshop.) Also remember that sophisticated flash attachments will produce a better quality by far than a point and shoot camera's pop up flash. (And of course, professional studio lighting creates beautiful portraits, which I'm assuming none of us have!) The indoor shot where I've bounced the flash looks better, but in my opinion, the natural light, without any flash is the best by far. What do you think?

(Just a quick note on the portrait of the green tie man. He was in shade, but the building in the background was in sun and brighter than he was, so I used a small amount of fill flash to brighten his face so he was not overpowered by the background.)

Monday, March 16, 2009

Are You Wearing GREEN???

Happy St. Pat's Day!!!! Kay Lynn and I were at our photography workshop in Santa Fe over St. Pat's Day a few years ago. (At least I think so since this guy was dressed up like this.) Every day we had an assignment. This day the assignment was something like "shoot strangers at 20 feet". Each of us had to wander the streets of Santa Fe, engage strangers in conversation with the goal of making them comfortable enough so they would agree to have their picture taken by a stranger at close range. I had no idea how intimidating this would be until I had to do it. No cheating and sneaking a candid without the person knowing. This man was on his way to work, and I complimented him on his handsome tie. (I'll talk a bit more about this portrait tomorrow on Tech Talk Tuesday.)

Friday, March 13, 2009

Flowers for Mom

My mom was a gardener. She loved her garden, she loved flowers and had beautiful flowers of all varieties blooming year round. Sometimes she picked them to arrange on our table for dinner, but not often because she loved to see them growing naturally outside 'where they belonged'. She gardened the summer before she passed away at age 96. That spring I was down for a visit and suggested we go for a ride. She had never seen where my brother Paul worked, which is in Antelope Valley, over the mountains and in the high desert of California. Spring in this area is very fickle. Many years spring brings green hills with a few wildflowers here and there, and then every so often the spring weather conditions are just right and there is an explosion of vibrant colors everywhere you look as far as the eye can see. It is glorious. It is intoxicating. It is heaven. That spring was one of those years. This was the last real outing my mom and I had before she passed away and Heavenly Father put on a show for her that was as memorable as she was. My mom and I had a wonderful day , just the two of us, that I will never forget. She passed away about 8 months later. Scroll down to see a picture I took of her at that time.


My mom was as kind and sweet as this picture portrays her to be. She never got grouchy as she got older and would always thank everyone who helped her. I miss her a lot. I like to think my mom and dad are having fun with their great grandson right now!

Thursday, March 12, 2009

Spring in Chesterfield Missouri

If we were living in Missouri right now, I bet I could look out my kitchen window and see beautiful white and pink dogwood flowers peeking out from behind the bare brown trees in the woods behind our house. Oh how I miss that beautiful spring show. (This photo, however, was taken several years ago in late spring behind the Lion House where there used to be one lone dogwood tree. I don't know if it's still there.)

Tuesday, March 10, 2009

Tech Talk Tuesday

We were discussing COMPOSITION, (having an interesting subject or subjects, and having a visually pleasing arrangement and presentation of the subjects in the frame).

In previous posts I gave a few basics about:
1. Simplicity
2. Perspective or View

Today I'll give you a few ideas about Lighting. Some would say that lighting isn't really part of composition, but I think it is. It's how your subject is presented, so I'm talking about lighting here. I'll start with an incredibly profound statement from Joel (see previous posts). "Good light is good, and bad light is bad." He says that a good photographer spends years honing his skills to see 'good light'. Lighting is often the least understood by beginning photogs but will make or break a picture. Often we see photos that are uninteresting yet we can't quite put our finger on why. Many times it is because the lighting is flat and boring. A good example of this is in my previous posts of the St. George Temple and that will be my example for this week as well.

I'll split lighting up into two categories and talk about taking pictures of landscapes today and pictures of people next week.

Landscapes:
This is simple and can be summed up in two words...DAWN & DUSK!!! Now I understand that most of us aren't thinking about taking photos at dawn or dusk, but if you really want to capture a beautiful landscape scene (vista with mountains, lake, trees, ocean, etc.), this is when you must shoot. In fact, I think I'm safe in saying that probably 99.9 percent of landscape photographers do not like to shoot at any other time of day except the brief time before and at dawn and the time just before sunset, at sunset, and for a brief time after the sun goes down. (Exception to this rule is, photographers also like bad weather, rain, fog, sun and rain together, etc. And, the absolute worst weather for landscape photography is a bright sunny day at high noon!) Anyway, Dawn & Dusk produce 'magic light' that will transform your ordinary photos into memorable ones. This is a dilemma because most of us are more interested in taking pictures in the middle of the day. Well, if you are on vacation, you often have no choice and so you have to shoot when you are there; but, if you really, really want that once in a lifetime beautiful photo of the Golden Gate bridge as a remembrance of your trip to San Francisco, you'll need to get up when it's dark, (which usually means leaving your spouse sleeping peacefully and snugly in bed), and venture out to your predetermined shooting location and be ready to shoot away just as the dawn begins to break. The other alternative is to schedule your activities so you are on location and ready to shoot just before sunset. This also means that you have scouted out your subject beforehand and determined whether a sunrise or sunset shoot would work best for your composition.

If you must shoot during the middle of the day, try not to take pictures of large expanses of boring sky (unless it has big, puffy clouds or a rainbow in it)! If you are taking close ups of flowers, etc., then find subjects that are in bright shade and not in direct sunshine. Try not to shoot at noontime when the sun is directly overhead.

Additional info you probably don't need: If you own an SLR camera, and you like to shoot landscapes, water, foilage, flowers, just about anything outdoors, you absolutely, positively MUST purchase a circular polarizer filter for whatever lens you are using. After that purchase you then need to buy a few split level neutral density filters. (For anyone wanting more info on these filters, what they do, and why you must have them, leave a comment or e-mail me.)

Assignment: Find a landscape scene and take a picture at noon on a bright, sunny day. Then take another picture of the same scene either at Dawn or Dusk. Then compare the two. Notice the difference in color. Early morning pictures usually have a blue or magenta cast, while early evening pictures usually have a warm orange cast. Also notice where the shadows fall at different times of day. At noon, there are few shadows, so everything looks flat. At Dawn and Dusk when the sun is very low to the horizon, soft shadows wrap about the objects in your picture giving depth, and a 3D effect, which is more realistic and true to life. (Go back and look at the pictures of the St. George temple again, and see the difference in the details of the temple itself in the different lighting situations.)

Phriday Phun ANSWERS

O.K. here are the mystery items:

1. Coated wire wisk
2. Piano keys
3. Cheerios box
4. Banana slice

Friday, March 6, 2009

Phriday Phun.........

It's Friday....relax a bit from all the hard work you have accomplished during the workweek. Take a little break from your worries, problems, sorrows, concerns. This weekend, do something you enjoy that will renew your spirit, 'sharpen the saw', etc., even if it's only for a brief while. Just for a few minutes, be carefree, be silly, be a bit more childlike. Here's a start. Guess what the following photos are? Let me know if I've made this too easy or too hard. (They are all very common items.)

Mystery Photo #1


Mystery Photo #2


Mystery Photo #3


Mystery Photo #4

Thursday, March 5, 2009

P.S. to Previous Post

O.K., here's my critique of the previous photos all titled, "Twin Rocks":

View #1
This is a pleasing composition and utilizes the frame well. Like Tiera says, it tells a story because there is a Beginning, (foreground- tree), Middleground (middle-rocks), and End (background-sky/clouds). The rocks stand out as the focus and the other elements contribute. I also like the diagonals (diagonals are most always pleasing in a picture). Do you see the diagonal in the clouds that mimic the landscape horizon, then the sun shadow diagonal in the opposite direction adds balance.

View #2
This is the most unique perspective. The twin rocks are still the center of attention and the tree limb frames the subject nicely. If this view had a different title, this would probably be my favorite, because I tend to like photos that grab my attention because they are different. But if the title is "Twin Rocks", then other views are better.

View #3
This is the cluttered picture. (Good job picking this one out Amber.) There is too much going on, and not one element stands out as the subject. The tree limb blocks the view of the twin rocks, there's a scrubby bush in the center of frame, the rock on the right is larger than the twin rocks and there are two distracting parts of green bushes on both sides. This is definitely a 'hit the delete button' image for me.

View #4
This view is o.k. but not too dynamic. Shows various elements in relation with the twin rocks. The twin rocks are shown well, but the rock on the right is larger and competes for attention. This photo is O.K. but it would end up in the trash bin for me.

View #5
I like the diagonal composition, and the sky is interesting, but again, the large rock on the left competes for attention if the title of the photo is "Twin Rocks".

View #6
A pleasing composition element is called 'leading lines' meaning that there is a a line of something that directs the eye to the main subject. Here I tried to use the little ravine going from the bottom of the frame up to the top where the rocks are as a leading line; however, the line is boring and the bottom half of the frame is boring, and the angle of the camera gives the rock in front as much importance as the twin rocks, and makes them all look small compared to the rest of the composition. Into the trash bin it goes!

View #7
This view shows the twin rocks in context with it's surroundings and emphasizes their size, shape and why they were important enough to be noticed and named. Surrounding rocks don't detract, sky is pretty. This photo also has a Beginning/Foreground, middle/Middleground, and End/Background. And, the twin rocks are placed in a pleasing location in the frame, (not dead center-I'll talk about this later).

SUMMARY: My first choice would be View #7, if the title is "Twin Rocks" and my goal was to help the viewer see and remember what the twin rocks were like. If I could name the photo something else, then View #1 and View #2 would be neck and neck for my favorite. All the others would hit the trash bin. Remember, however, beauty is in the eye of the beholder and photography like all artistic endeavors is subjective and personal! Have a good day, and get those cameras out!

Tuesday, March 3, 2009

Tech Talk Tuesday

Wow, another week has gone by very quickly. Today will be a follow-up on last week's discussion on SIMPLICITY and PERSPECTIVE. To sum up......

Simplicity - Remember to decide what your main focus is and the reason for the photo, then zero in on your subject, and eliminate all other distractions. As a side note, this does not mean that there should not be other items in the picture, it means that all other items in the picture should support or enhance the main focus and not detract.

Perspective or view - Taking shots from different perspectives or views can help you make a more interesting and dynamic photo, and let the viewer see more clearly why you took the picture. Different views of the same subject can help you find the shot that has the most appeal, shows more emphasis, tells a story better, better defines your subject, etc. When possible, take many shots of your subject from different angles, from different focal points (zoom in, zoom out). Look for views that most people would miss. Then as you look through all of the possibilities, one or two will jump out at you as the 'best' for what you were trying to capture.

TODAY'S ASSIGNMENT: Last weekend Jeff and I took a quick overnight trip to Lake Powell, (don't ask), and came home the long way through Capitol Reef National Park. I took a bunch of pictures of a landmark called 'Twin Rocks'. Remember that the title of the photo is 'Twin Rocks'. Study the following photos, and decide which one is the most interesting and makes the twin rocks look most appealing to you. Now before you get stressed out over this, there is no right answer. All the photos acceptably show the twin rocks from different perspectives or views, so it is a matter of taste. There is one exception. I threw in one that for me, is not good at all. It breaks my rule of simplicity, and items in the frame detract from the subject. See if you can spot this one. Then decide which perspective of Twin Rocks do you like the best and why? If you're brave enough, let me know.


View #1


View #2


View #3


View #4


View #5


View #6


View #7

Friday, February 27, 2009

The Miracle of Photography (to honor a greater miracle!)


Could photography be considered a modern miracle? I say yes. Maybe not in the same way as antibiotics, space travel, computers, etc., but isn't it amazing that with a click of a button on a little rectangle box, and with no particular talent, any of us can 'make time stand still', then years later be able to look at a picture and remember in exact detail what food you had at a party, what you really saw on that vacation of a life time, how your missionary looked as he waved goodbye at the MTC.......especially what a loved one looked like at a specific second in time. For those who come after us to actually see our lives and get to know and remember us through our photographs is amazing to me.

I want to thank Adam and Lisa for giving me the honor and privilege of knowing Gabe during his brief sojourn here in mortality. What memories I have, and I am forever grateful to have pictures to remember so many details that I would have forgotten with all that was happening in those brief 2 hours and 17 minutes. (Likewise, I am so grateful for every photograph and video I have of Gavin in his short almost 15 months with us. I treasure each one. They are truly my priceless possessions.)

There is a non-profit organization called Now I Lay Me Down To Sleep. Its mission is to send professional photographers to hospitals all over the country to photograph dead or dying babies. Usually this is due to late term miscarriages, or stillbirths, or situations like Gabe. This gives the parents beautiful portraits to keep the memory of their little one alive and is given with love at no cost. A lovely lady (professional photographer), who had also lost an infant, took beautiful photos of Gabe, however, the one posted here is one of mine. These once-in-a-lifetime photographs are not only memorable, they are priceless.

Yesterday I ran across a blog by a local photographer who is involved with this organization. Last year she sent one of her images in to a contest and won. It speaks volumes on the sanctity of life, no matter what stage of life one may be in. The parents will treasure this forever. Please click on the following link and scroll down to her post, NOW I LAY ME DOWN TO SLEEP, Wed, Sept 24, 08, and then to SOUTH VALLEY JOURNAL, Sat, Sept, 6, 08. Click on the newspaper article to see the enlarged photo. I hope this beautiful image moves you as much as it moves me!
http://www.kathrynmichaels.blogspot.com/

Wednesday, February 25, 2009

Another Goofy Tourist!

He looks familiar, but can't be the person I know, who would never do something like this..... Just goes to show ya what happens when you're on a vacation, far far from home! (This was taken in Jamaica several years ago.)

Anyway, I just had to post a quickie 'laugh for today', especially after yesterday's post that I'm sure put everyone to sleep!

Hope everyone has a great day.

Tuesday, February 24, 2009

Tech Talk Tuesday

Today I'm going to start with some random thoughts about creating memorable photos, then later give more specifics. So here we go.

Be On Location:
Sherrie mentioned that by the time she gets her camera out, the moment is gone. This brings me to my first thought. Learning how to take decent photos takes some forethought. If your camera sits in the back of the closet and is only brought out once in a while, your chances of producing memorable photos are slim. So the first thing to do is to have your camera handy....on location. Keep it where your family congregates. Put it on a kitchen shelf or in a handy drawer in the family room. Make sure it is charged and has a clean memory card. (I'm making the assumption here that we all are shooting digital.) If you shoot with a compact point and shoot, keep it in your purse when you are away from home like Aunt Jan does. I try to keep mine in my car, but don't always, and there have been many times I wish I had it with me. You won't use your camera, if it's not close by.

Shoot, Shoot, Shoot!
It is the law of averages. The number of memorable photos you end up with is proportional to the number of photos you take! Digital photography has set us all free. No more worrying about wasted shots, wasted film, wasted money as you get your roll of 36 back from the developer and only have 2 decent pictures. We now have the freedom to experiment, figure out what works and what doesn't work. The learning curve has really been shortened. But, here's the caveat...if you pull your camera out and shoot a million pictures with no thought to composition and other photography basics, you probably still won't improve and you'll have a million boring shots. If you really want to improve, you must give thought to what you're doing and learn as you go. Give yourself some challenges, (see if you can take a 'good' photo a day for a month, document the growth of one tomato plant from seedling to harvest, pick a subject and see how many interesting views you can take, pick a subject and take pictures at all different times of the day and night, etc. etc.) Think up some fun, creative and challenging learning projects, and remember that like every skill, the more you practice, the better you will get, and more of your photos will be interesting and memorable.

Check Out Your Camera:
A good photographer can take memorable pictures with any type of camera, from simple point and shoot, to expensive SLR. The trick is to know the limitations of your camera, and compose pictures within those limitations, and, to make sure the camera you are using is in proper working order. (Sherrie, your camera may not be working right, or if you have rechargeable batteries, you may need to buy new ones. Old batteries can slow down the recovery time.) Digital cameras are so reasonable these days, that you should have a camera with basic features and a reasonable pixel count. Over and above this, if you are becoming frustrated because you see a picture but your camera won't allow you to take it, maybe it's time to save your pennies and upgrade. There are terrific buys on e-bay. (If anyone is interested in my views on cameras and camera brands, let me know.) Whatever camera you use, make sure it is working, then read the manual from cover to cover several times so that you know every feature and how each one works.

Time & Effort:
This hardly needs to be said, but I will say it anyway. All of us will get lucky once in while and take wonderful photos that in some way have the thing, (see previous post). ...pictures that are timeless, that we want to look at over and over and they become family favorites. But to 'see' these pictures in our mind's eye before we push the button takes time and effort and practice. Like I said last week, most of us have other hobbies and interests more important that taking pictures, but if photography fascinates you, you can learn how to take great pictures...at least more often than most people. It's an acquired skill; the technical side of learning about exposure, shutter speed, depth of field, etc., and also the artistic side, like learning the basics of strong composition. Joel Sartore, photographer for National Geographic says, "Writing and photography are not bestowed, they're accquired". (Side note, Joel Sartore is the National Geographic photographer who ran the workshop Kay Lynn and I attended several years ago. We learned a ton and had so much fun as well. I'll probably be quoting the wit of Joel frequently.) Anyway, when Jeff bought me my first nice camera, I had to justify the expense by learning how to use all of its features. I went to the library and read every photography book they had. I slowly built my own library of photography books, and now, the education one can receive free on the internet is limitless. I've found several websites where photographers post their work, and make comments and critique each other's photos. I've learned so much in this way. Two are www.webaperture.com and www.perfectlycaptured.com Check them out. So, if you want to improve your photography skills, you must take the time and effort to learn the basics, then practice.

Now for the basics. I mentioned there are some tried and true 'basic' rules of photography. Some apply to the technical side, and some apply to the artistic side, or the composition of a picture. According to Joel Sartore, here are the first two rules of photography:
1. "The first rule of photography is, there are no rules"
2. "The second rule of photography is, refer to Rule #1"
This of course is 'tongue in cheek' but his point is, you learn the basics, and then see if they apply to the composition you are planning to capture. Most of the time following the basics will create a more dynamic composition, but sometimes, the exception to the rule applies and breaking that rule will make for a more interesting photo.

With that disclaimer out of the way, I'm going to start with ways to improve COMPOSITION, because like I said in the previous Tech Talk, you can screw up all the technical stuff and still have a great photo if you nail the thing, and that usually has to do with composition. Simply speaking, composition means, having an interesting subject or subjects, and having a visually pleasing arrangement and presentation of the subjects in the frame. Some of the elements that make up a pleasing composition are:

* simplicity
* perspective or view

* lighting
* framing
* balance

* lines

* rule of thirds

* mergers

* energy
* depth of field

I'll mention the first two today. Usually the less cluttered a photo is the more appealing it is. If you take a picture of your child sitting at the kitchen table, the viewer may get distracted from his cute smile because he is busy looking at the dirty dishes on the table, the stuff on the countertop behind him, the busy wallpaper in the background, etc. When you look thru the viewfinder, look for simplicity. Move to a different angle or zoom in so the focus in on the cute smile and the distracting things are not in the frame. "If your pictures aren't good enough, you're not getting close enough." In other words, fill the frame with your subject, and leave out the distractions.

Look for interesting viewpoints or perspectives that most people don't see. Everyone looks down to see a flower. Try getting down and shooting up for a view of the stem and underside of the petals. Everyone sees beautiful sunsets. Try taking a photo of the reflection of the sunset in a window or a pond. Try to see and capture what most people don't see, and your photos will be more memorable. Everything can't be dramatic. Here is a simple example:
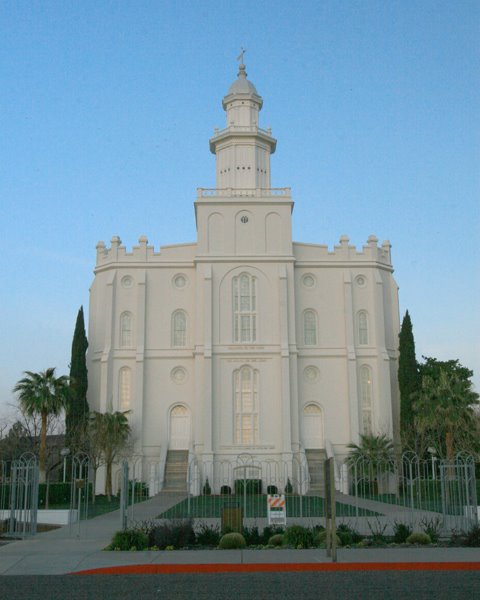


This is a photo of the St. George Temple I took this past weekend. I took this picture mid morning. I walked in front of the temple, looked in the viewfinder and snapped. For me, this is a very boring picture. There is a lot of boring sky, and the distractions of the caution sign, red curb and pavement don't help. The light on the temple itself is flat. This photo does not give me the feeling I want to convey when looking at this beautiful place.
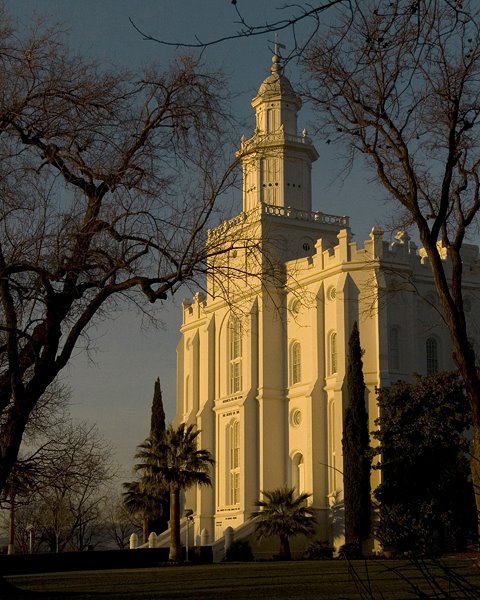


Another morning I got up before sunrise, (Jeff was still sleeping of course!), and I walked around to find a view that had no distractions and that showed off the beauty of this temple. Here the trees frame my subject, (I'll talk about framing at another time), and the beautiful, warm light of sunrise gives me a feeling and mood more in line with how I feel about these sacred places.
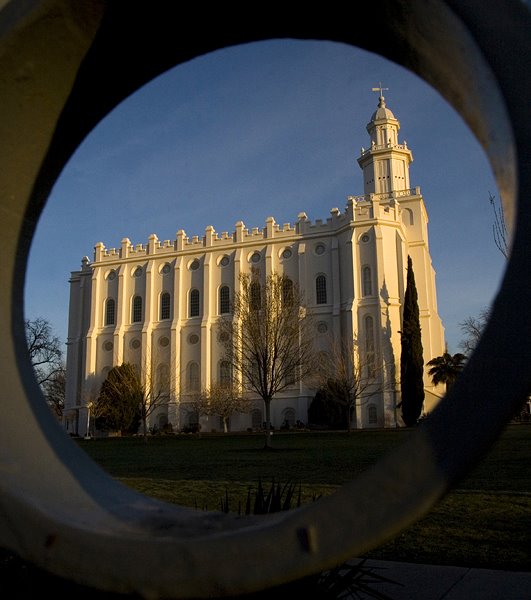


As I walked around and tried to find interesting views or perspectives, I noticed the unique fence surrounding the temple grounds and took some shots with the fence in front of the temple, but they were too busy, and the fence, while beautiful, took away from the main focus, which is the temple. Then I decided to use the fence as a frame to highlight the temple. This is a unique and interesting view for me. (Jeff isn't crazy about this one. Like I mentioned before, you're not going to please everyone!)
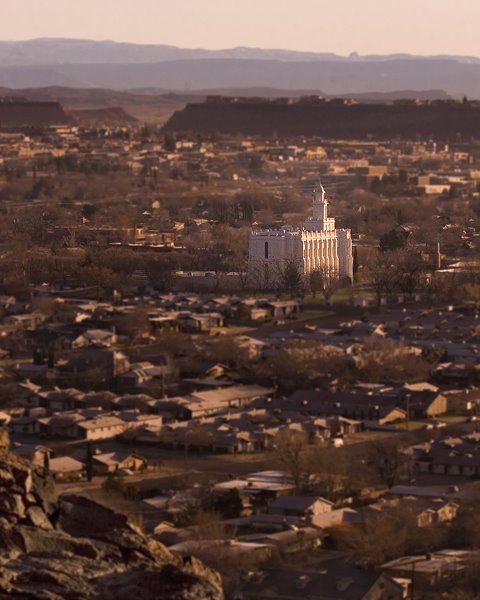


Last but not least, I wanted a view where I saw the temple in connection with its surroundings. I took the road to the airport, still in the early early morning. I love the soft morning colors, the layers the background mountains make, and especially the morning light highlighting the temple which is in sharp focus, while the surrounding areas are in soft focus.

So enough for today. Let me know your 'critiques' of these photos, and fire away with any questions. Scroll down to see some questions and answers from last week.

Questions & Answers

Question: Would you tell us the settings you use on the photos you post, (exposure, shutter speed, focal length, etc.)
Answer: I am usually too lazy or forgetful to remember to do this here on the blog; however, I put all these photos on the website I use to store and preserve my photos and it has a great feature. When you are in a gallery, hover your mouse over the right side of the spotlighted photo, (the large one in the viewing area), and a pop out box will appear. And down at the bottom it will say 'Photo Info'. Click on that and it will give you all the technical details. The website is: www.karenlarsen.smugmug.com

Question: What is a good photo editing program for an amateur who likes to scrapbook?
Answer: I know there are many adequate editing programs that will work just fine, but the granddaddy of all editing programs is Adobe Photoshop. The bad news is that this program is around $600, (give or take $100), but less if you are a student. The good news is that Adobe makes a simplified version called Adobe Photoshop Elements. It's been a long time since I checked, but I think you can get it at Costco for around $69 - $80. I used Photoshop Elements for years and it had every feature I ever needed for photography work. This would be my recommendation.

Question: When I try to take random shots they just come out a big blur. Does your camera equipment make the difference?
Answer: Yes and No! There are multiple reasons for blurry photos. Here are some of them:
1. It could be a camera problem, and if it is, this would be hard to answer without knowing the camera. If you use a point & shoot, most likely the camera assumes you want to focus on the main subject which for most amateurs in smack dab in the middle of the viewfinder. Your camera doesn't know if your subject is off to the side, so it focuses on the middle. Most cameras have numerous focal points around the viewfinder. You have to read your camera manual and learn how to tell which one is 'active' and place your subject on that point. Another camera problem could be that your shutter speed is too slow to 'stop' the action. Here again, the type of camera makes a huge difference. On an SLR (a camera where you can change lenses), you have lots of options for adjusting shutter speed. On a point and shoot, you can usually change your program mode to 'action', (usually a button on top that points to a little guy running), and hope you are shooting in bright light. If you are shooting indoors at night you must use flash and with some cameras be fairly close to your subject.
2. It could be shaky photographer syndrome. Particularly with candids, we are in a hurry so as to not miss the moment. It is very common to move the camera as you are pushing the button. Particularly with point and shoot cameras where you hold the camera way out front and look at the LCD screen. Having a traditional viewfinder and putting the camera up to your eye and next to your face helps you hold the camera steady. There is also some conscious thought to pushing the button slowly and carefully so that the camera does not move during this motion. The slightest vibrations can cause blurry pictures. (Obviously the best way to avoid camera shake is to use a tripod, which, however, is highly impractical if you are shooting candids of moving kids.) Here's a side note.....sometimes photographers use selective blur intentionally to enhance the effect of the photo, i.e. to show movement, action, etc. This month's National Geographic has numerous blurry photos that are outstanding, but they are purposefully done.

Monday, February 23, 2009

A BREAK FROM WINTER

Jeff & I needed a break from winter....well, I needed a break from winter, so Jeff took me to St. George for a few days. The temperature was not much different than home, but the sun was shining, the wind wasn't blowing, and there were no piles of dirty snow to look at. Here are a few pics....I'll post the rest on the website.

Huge lava sinkhole (Snow Canyon)


Color coordinated! (Zion NP)


My knees, calves, hips all hurt after walking to this waterfall in Zion NP. I'm so out of shape!


I saw this reflection and thought it'd make a neat picture.


Can you see the people on top of the waterfall???


A beautiful Vista (Zion NP)


Jeff sitting on 'waffle' rock (Snow Canyon)


Wednesday, February 18, 2009

P.S. to Previous Post

I forgot to say that in my next 'Photography Chat' I'll talk about some ways you can increase your chances of capturing the thing in more of your photographs. (For those of you who have no idea what this means, read previous post.) Also, answers to your questions coming up soon. (I'll probably do Photography Chat once a week or so.)

Tuesday, February 17, 2009

Tech Talk Tuesday

First of all, I'm about the least technologically savvy person I know, so it's pretty funny to title this post 'Tech Talk'. Second, this blog is purely my, 'downtime, relax and don't think about winter for a few minutes' diversion, so, when spring comes and I can escape to the great outdoors you will probably never hear from me again....(just kidding... I think!) Third, my photography is a wonderful, artistic hobby for me and my goal is to relax and have fun, because I'll never win any awards with my stuff!

With the above disclaimers out of the way, I'll move on. I get a lot of questions from friends and family about my pictures, i.e. what camera equipment do I use, what settings for a particular shot, (exposure, lens, aperture, etc.), how did I get that effect and so forth. The age of digital cameras has made photographers out of all of us, so I thought it would be fun to have a little photography chat once in a while, but don't worry, nothing toooo technical because I'm not capable of that.

So, ask me questions, either general photography stuff, or about a specific photo, and we'll see where this goes. Either use the comments section of this blog or e-mail me at:
karen@karenlarsenonline.com

I'll also give my suggestions about how, with a little info, anyone can take much better pictures. (Another disclaimer here: if you are well past Photography 101, or you are happy just snapping a few candids with your iphone, or you just like to look at someone else's pretty pictures, scroll past this post.) Sooooo, here we go with my thoughts for today:

Hummm, I think I'll start by telling you the most important thing you should know if you want to take memorable pictures....... and it may not be what you think. Here is what that thing is not:
It's not perfect exposure
It's not perfect lighting
It's not perfect composition
It's not knowing all the general photography 'rules'
And it's certainly not how much fancy equipment you have!

Here's the thing: .......... Oh, look at the time, I'll have to continue this tomorrow!

(Just kidding!)

To take memorable pictures you have to emotionally 'move' the viewer, (and or you the photographer), in some way. When he or she looks at your image, it must evoke a feeling, a mood, a memory. It must make him or her sad, happy, want to cry, laugh, rage, do something, tell someone, etc. You have to tell a story that will be meaningful to your viewers - of course not all of them, only some of them. (World famous photographers, I think, have learned what types of images and stories will move the greatest number of diverse people.) Do you get the idea? Now, that doesn't mean that all useful and important photography must do this. But for me, the type of pictures I'm talking about are the ones we remember most, (the soldiers raising the flag at Iwo Jima, the firefighter carrying the dying child after the Oklahoma City bombing). Those two examples create emotion for most all Americans and we all remember them. Our pictures, yours and mine, will probably only create emotions, memories, stories for a smaller circle, but will be relived again and again by those who come after us. And it doesn't have to be like those dramatic examples. If you capture your child with a particular look or behavior that is uniquely theirs and reminds your family of the special times when they use 'that' look, then you have succeeded. So much better than a 'look at the camera and smile' picture. (Although, once again, classic portraits are important, too, and will always be part of one's photograph collection.)

So the bottom line is......if technologically speaking, you do everything wrong when taking a picture, yet still manage to capture the thing, you will have a wonderful photo. But, if you learn some of the camera basics I mentioned above that the thing is not, you will take a wonderful photo and turn it into a memorable one!
Goal: Create story telling photos that family and friends want to look at over and over again because of the memories and feelings they evoke. (In my humble opinion, your photos should be more interesting and creative than the scrapbooking page they are stuck on. Ouch!)

Scroll down to see two simple examples of the thing in the next post, AND REMEMBER TO ASK ME SOME QUESTIONS SO I KNOW WHERE TO GO WITH THIS.

Engagement


I took lots of classic pix like this one, many they liked and ordered.


But this is the one they really liked, and I think they ordered a 16 x20. It was an accident! I was changing the card in my camera and they were 'taking a break' from the photo shoot. I looked up to see this tender moment and shot......into the sun, sky blown out, not really a silhouette, all orange, lens flare, bad lighting, bad exposure, etc. But for them I must have caught the thing because this was their favorite. Funny, when I was going thru all the shots before giving them the 'proofs' I had taken this out as a total mistake, then for some reason I must have had a glimpse of the thing because I put it back in at the last minute. I even apologized and said it was a bad shot, but they might like it anyway. Like I said, this was their favorite, and it taught me a good lesson.


Scroll down to see another example.

Another Baby!!!!


This was a quick candid at a family party and I just happened to be in the right place with my camera pointing the right direction. Her daddy had just made an announcement to everyone that they were going to have a new baby join the family. I just love, love, love this sweet expression. When I look at this photo I will always remember what happened to create this sweet look of anticipation at hearing such exciting news. Much more of a memory than just a 'smile for the camera' moment.


Comments or questions please....or both!