

Saturday, August 31, 2013
Thursday, August 29, 2013

Sunday, August 25, 2013
Beautiful Bokeh - Part 4

Light Dance
(My camera settings were: 100 mm, 1/640 sec, f/2.8, -2/3 exposure)
In my last post I talked about how to look at your composition, the background, the quality of light, and your camera and lens settings to capture and enhance bokeh in your images. Today, I'm going to talk about using technology to really get your artistic juices flowing. Specifically, I'm going to talk about using layers, textures, and brushes to create interesting backgrounds. I can't show you HOW to actually do this in a short blog post, but I hope to get you excited about adding a new dimension to your photography.


Light My Fire
(My camera settings were: 100mm, 1/640 sec, f/2.8, -2/3 exposure)

Call it what you will: photo fakery, magic, photo art, editing, photography, artistic impression, post processing enhancement, the digital darkroom, or just plain amazing..... photography has made revolutionary changes since the invention of digital cameras, the computer and photo editing programs. And whether you love it or hate it, we photographers have to adapt one way or the other. IMHO, (however), photographers who do not take advantage of what technology has to offer will become increasingly dissatisfied and discouraged with their own photography. Why you ask? Because photographers who only shoot SOOTC images, will not produce nearly the number of 'keepers' or great quality images, as the photographers who take advantage of current technology to enhance good images, compensate for the limitations of what our cameras cannot do, or to edit photos as part of artistic or creative interpretation. I can't help but think that if Ansel were alive today, (a master of photography and darkroom editing), he would embrace all the creative tools available to help him produce his imagery.
So, the first step is to learn about the amazing photo editing programs available, decide which ones are right for you, then take to time to learn how to use them. The ones I use regularly are: Lightroom; Photoshop; OnOne Perfect Photo Suite; Nik Color Efex; Photomatix. Don't get discouraged, you don't need all these programs. I've just added them gradually over many years. And I might add, I've never taken a class on how to use them. They come with tutorials, and there are dozens of online classes, (many free), and books. I only know a small part of what these programs are capable of doing and yet, I've managed to learn what I need to know.
You must, however, choose a program that allows you to work on 'layers' such as Photoshop or Photoshop Elements, and learn and understand how to use this 'magical' feature. After that, the sky is the limit!
I love taking photos. And I equally love taking those photos and seeing how they can be improved. Almost always, I tweak the exposure, and maybe add a bit of vibrancy for nature shots. Many times, I'll crop, remove sensor spots, remove distracting objects. Once in a while, I'll add an interesting texture, change to sepia, B&W, or add a color tone. Rarely but sometimes, I'll change an entire background, swap a head, or do something 'other worldly'. The point is, one can choose to edit a little or a lot. There is no right or wrong despite what some diehards may say. You as the artist get to decide.
Oh, and in case you are interested, the original photo in Part I of this tutorial had a soft, blurred, boring pink background. I blended in a pink bokeh texture. The backgrounds in the photos in Part 2 and 3 are all natural with bokeh created from my camera settings and composition.
Saturday, August 24, 2013
Beautiful Bokeh - Part 3

Bokehlicious
100mm focal length, 1/125 sec at f/2.8
So, here's how to create beautiful bokeh backgrounds:
(See previous two posts for Parts 1 and 2 of this tutorial.)
1. Look for just the right composition. Look for a background that has softly dappled light peeking through interesting textures; or water droplets clinging to stems or other objects; or interresting reflections, or a combination of all three.
2. Find an angle where you can position your camera close to your foreground main subject and have the interesting background some distance away.
3. For those who have a point and shoot camera, and just want to, hummm, point and shoot: Put your picture mode to Portrait and experiment, and then change to Macro and experiment some more. If your camera has the ability to independently change the aperture setting you will have better results. Continue reading.
4. For those who have a DSLR: a fixed macro lens set at a large aperture, (small number), seems to work best for me. I use a 100mm, 2.8 macro lens. If you have a zoom lens, that will work, too. Be sure to set it to the longest focal length and largest aperture, (see next point.)
5. Bracket, bracket, bracket. This means, put your camera in Aperture Priority mode and take many different shots, varying your aperture. Each change of the aperture will alter how soft your background focus is, and will also change the size and softness of the bokeh, giving the image many different looks. Then you get to decide in post processing, which one you like best.
The formula for achieving the look you want is practice, observe, practice, observe, repeat, repeat, repeat. You have to become familiar with the possibilities and limitations of the lens you are using, and you also have to develop an 'eye' for the type of compositions that will create bokeh and will compliment your main subject.
For even more fun and more flexibility in creating your beautiful bokeh backgrounds, check back tomorrow and I'll talk about how post editing can be your best friend!
Friday, August 23, 2013
Beautiful Bokeh - Part 2

Misty Water Colored Memories
Before talking about the 'technical' ways to create beautiful bokeh, I want to talk about two things that come first..... and they are composition and light.
When I first became interested in photography, I either read, or someone said to me, "Watch your background; or, make sure there isn't a tree growing out of someone's head." So I learned to move my camera angle to avoid the head-tree distraction. But just because I avoided that mistake doesn't necessarily mean I improved my image as much as I could have with a little more thought to where exactly should I position my camera for the best composition.
As I mentioned yesterday, (see previous post for Part 1 of this little tutorial), backgrounds are an important part of an interesting photo. One that is too sharply focused distracts from your main subject, and one that is too blurred showing no detail at all, is just plain boring.
So, after you find your main subject, you need to look beyond the subject to what you see in the background. When I first composed the above image, there was a dark green hedge in the background. Boring! I moved to another angle, but then the sun was creating huge patches of white, blow out areas that overpowered my subject.
I moved around to numerous positions and looked through my viewfinder from many angles until I found this composition. The colors from an adjacent flowerbed created this beautiful palette of dreamy colors. The soft circles upon circles of light, bokeh, added yet another surreal dimension to the mood of the image. This was just what I was looking to capture.
O.K., you've been patient! Tomorrow I'll get down to the nitty gritty about how to create beautiful bokeh and how I created these images.
Thursday, August 22, 2013
Beautiful Bokeh

Dreaming In Pink
I remember way back when I first started trying to improve my photography, I discovered that my pictures had much more impact when I learned how to isolated my subject from the background. In other words, have my foreground subject in sharp focus, and have the background a soft blur. Wow, I really thought I had achieved greatness! Yes, my photos did look better, but now years later, I realize I've moved past that revelation. Maybe my tastes have changed, or I've become more critical or discerning, but now I often think that a completely soft, nondescript background is boring and really adds nothing to the photo. Backgrounds are an important part of the overall picture, although not as important as the main subject. Backgrounds can be used to enhance a mood, add supporting elements to a story, add visual impact.
There are many ways to jazz up your backgrounds, but for the next few days I'm going to talk about bokeh. In case you don't know, those large, globes of light you often see in the backgrounds of photos are called bokeh. They can be different sizes, shapes, intensities, depending on the type of lens you are using, the aperture, the scene itself, the lighting, the distance, etc. Bokeh isn't for every photo but can enhance a picture when you want to create a dreamy, soft scene such as with florals, weddings, or children's portraiture, for example. Turning Christmas lights into bokeh is another example.
The other day I was determined to take some flower photos before fall arrives. Here in Utah, we have had a very hot, dry summer, and our flowers are starting to fade quickly. Early in the morning I headed out to Thanksgiving Point, a beautiful garden spot close to home. Most of the flowers and/or stems were covered with water droplets, not from dew but from their early morning sprinkler shower. I immediately thought of water reflections, light and bokeh, and so specifically looked for compositions that would enhance a bokeh background.
For the next few days, I'll show you my 'keepers' from that morning and tell you how to create bokeh backgrounds to make your photos more visually interesting.
Wednesday, August 21, 2013

Sunday, August 18, 2013
Color Cordinated

This evening I sat beside a group of wild sunflowers in my backyard and observed and listened. The evening sun highlighted the brilliant yellows and greens, just as if colored with a magic marker. I watched as the busy bees moved from flower to flower, still working after a long day. Occasionally a butterfly or other insect stopped by but quickly moved on when a bee claimed his territory. The only sounds were the soft humming of the bees and the rustle of the breeze through the fluttering petals of the sunflowers. There is such beauty in ordinary things. It is amazing what one sees, hears and feels, if we only take the time.
Saturday, August 17, 2013
Look Into My Eyes.....

"An animal's eyes have the power to speak a great language."
--Martin Buber

"The eyes are one of the most powerful tools a woman can have. With one look, she can relay the most intimate message. After the connection is made, words cease to exist."
--Jennifer Salaiz

"His eyes are peculiar. There is nothing in them, like an eclair without the cream filling. It is wrong...."
--Gail Carriger

"There are no seven wonders of the world in the eyes of a child. There are seven million."
--Walt Streightiff
Tuesday, August 13, 2013

Saturday, August 10, 2013
Alpine Loop - Another Stop

Near the summit of the Alpine Loop (see previous post), is Cascade Springs where a boardwalk circles around a beautiful area of small waterfalls and pools.
Thursday, August 8, 2013
The Alpine Loop

Aspen & Red Berries
Still dark outside, the alarm on my phone coaxed me out of sleep with the mellow sounds of ..."it's a new dawn, it's a new day, it's a new life, and I'm feeeeeling good" by Michael Buble. At the moment I wasn't sure if any of that was true, but I crawled out of bed anyway, rounded up my camera gear and headed out.
The Alpine Loop is a beautifully scenic, twisty drive on a narrow road up American Fork canyon, winding over the top of the mountains, past Robert Redford's Sundance Ski Resort and ending up in Provo canyon. It is part of the Wasatch mountain range, which is part of the great Rocky Mountains, (commonly called the Rockies), that stretch north and south over 3,000 miles in western North America.
Spring and Fall are spectacularly beautiful here, with lush alpine scenes dominated by beautiful aspens trees with their white trunks and shimmering leaves flashing neon green in spring, and shades of bright yellow, and deep golden reds in autumn, and are set against craggy mountain peaks and the backside of Mount Timpanogas. With wildflowers in the spring, waterfalls and natural springs along the way, it is certainly a mecca for landscape photographers shooting in this area.
Since this drive begins only 10 minutes from my home, I try to take a morning off to enjoy this peaceful, beautiful place at least once during spring and fall. Since I missed spring this year, I decided to see if I could find some inspiring scenes in the middle of a very hot summer, even though down in the valley the scorching sun has dulled spring greens, wild grasses have turned brown, and flowers struggle to survive in this dry desert climate.
After dodging runners, bikers and deer who were all sharing the narrow winding road in the pre-dawn darkness, I pulled off to the side and took a short walk though the woods where I found this lovely, lush scene. I found my composition, set my camera on a tripod and was ready to shoot just as the sun peeked over the mountain and cast a beautiful golden glow highlighting the bright red berries that were the focal point of my picture.
The previous post of bees and butterflies was taken this same morning, as were the photos of waterfalls I'll post next. I was well rewarded for listening to my alarm, and it was indeed, a new dawn, a new day, and I did feel great after my morning commune with nature!
Tuesday, August 6, 2013
Butterflies & Bees

Can't We All Just Get Along??
Although there were hundreds of flowers and thistles where this shot was taken, this particular one must have been special, because the butterflies and bees were continually jockeying for a 'place at the table'!
(For those who are interested, I used a telephoto lens up close. That put the background of foliage and flowers totally out of focus creating a beautiful pallette of soft color. Because there is so much background visable, I added a texture using Photoshop layers to add depth and interest.)

Summer Job!
This bee decided not to share and found his own space.
Sunday, August 4, 2013
Very Funny.....Is this true?????
Humm, this kinda sounds familiar!!!
Is this just funny or can men really solve women's problems with a simple answer; or, are women's problems just simple and to the point (pun intended)??
Is this just funny or can men really solve women's problems with a simple answer; or, are women's problems just simple and to the point (pun intended)??
Saturday, August 3, 2013
August Desktop Image
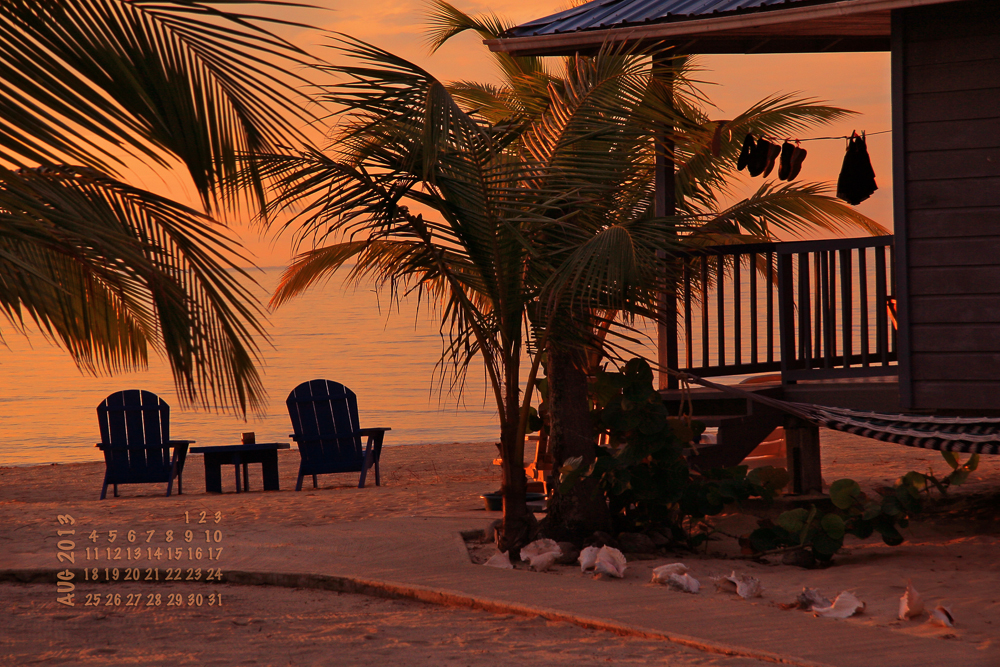
Beautiful Belize
We sat in those chairs in front of the little beach shack we rented for one glorious week. The amazing part was that there were no other tourists as far as we could see along the beach.
As usual, you can go HERE to download this image in high resolution for your desktop. It should not be blurry or pixelated. Share with your friends but please do not use for commercial purposes.
Friday, August 2, 2013
Arches National Park

DOUBLE ARCH
There are so many photographs taken of famous landmarks, that my challenge is to try to capture nature's beautiful scenes with my own unique composition. So often I see people walk up to a scene like this, and with no thought, snap a shot and turn and walk away. One of the things I like about photography is that if your goal is to make a good picture, it forces you to really look at the scene from different angles and viewpoints, and take some time to really observe and enjoy what you are seeing. For this picture I used a wide angle lens and took this shot from a low vantage point to add the dead trees for foreground interest. Since I was shooting into the sun, (although it was behind the cliff), I knew I needed to take at least three exposures and blend them together in order to properly expose the sky and the front face of the rock which was in shadow.
P.S. Can you see the little speck of sky peaking through the rock on the left side of the picture? This is the beginning of another arch. I didn't see it when I composed this shot, so I'm not sure how big it really is.
Subscribe to:
Posts (Atom)